Introduction
This technique is used in areas where the parallel technique is
impossible due to poor access, making the angle between tooth and
film more than 15 degrees.
Using this technique, a true image of the tooth length and width
is obtained.
|
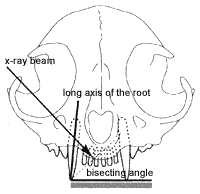
Principle
In any 90-degree arc, there is one angle that will allow an x-ray
beam to cast an accurate shadow of the tooth on the film.
The best analogy is that of a tree in the desert. When the sun
rises, the shadow of the tree is longer than the tree. At some point
in the morning the shadow and the tree are the same length. This
is the bisecting angle. The sun continues to rise until, at its
zenith, the shadow is very short. In the afternoon the same sequence
occurs in reverse. Therefore in the 180-degree arc of the sun during
the day there are two bisecting angles.
For this to work three angles are calculated.
|
|
Angle A is the long axis of the tooth.
Angle B is the angle of the film.
Angle C is the angle that bisects angle A and B.
The beam is then directed at 90 degrees to angle C.
|
|

|
|
Comment
This technique is essential for the incisors and canines in both
jaws and preferable, but optional, for the maxillary premolars and
molars (see extra-oral near parallel technique).
|
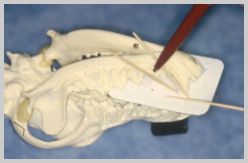
Example 1 - To Radiograph the Mandibular Canines and Incisors
|
-
Position the dog in dorsal recumbency, with the palate parallel
to the tabletop.
-
Place the film carefully in the mouth, so that all of
the target tooth will show on the film.
-
Hold the film flat with mouth props or swabs.
-
Calculate your angles and direct the beam (at approximately
45-degrees) onto the plate.
|
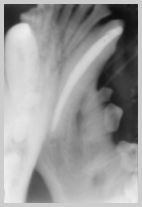
Bisecting angle technique
- oblique lateral - for 304 canine tooth
|
-
Note that to show all of a canine tooth without superimposition,
the beam needs to be angled slightly out to in (i.e. from rostro-lateral
to medio-caudal). This is lateral oblique. However, it is good
practice to take a second lateral bisecting angle view. This
will show pathology that may not be visible on a lateral oblique
bisecting angle view.
|
The apex of this 304 canine has
been missed due to incorrect angulation
|
|
Example 2 - To Radiograph the Maxillary Canines and Incisors
-
Position the dog in sternal recumbency and place pads below
the head, to keep the palate parallel to the table.
-
Place the film in the mouth so that all of the target
tooth will show on the film.
-
Hold the film flat with mouth props or swabs.
-
Calculate your angles and direct the beam at approximately
45-degrees to the plate.
|
Bisecting angle technique for
maxillary cuspid (canine) in the cat.
Courtesy of Dr Verstraete
|
|
Bisecting angle technique - oblique
lateral - for 104 canine tooth
|
|
-
When taking radiographs of upper canine teeth, angle slightly
out to in (i.e. from rostro-lateral to medio-caudal) to avoid
superimposing incisors at the apex of the tooth. As with the
mandibular canine, a second lateral bisecting angle view will
provide information that may not be visible on one view.
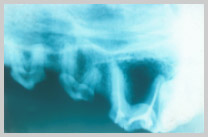
Fractured upper canine of a young dog with immature, thin
walls and an open apex |
|
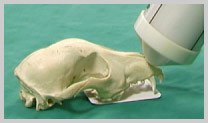
Example 3 - To Radiograph the Maxillary Premolar (Carnassial)
-
Position the dog in sternal recumbency and place pads below
the head, to keep it stable.
-
Place the film in the mouth, under the carnassial, so that
all of the target tooth will show on the film.
-
Hold the film flat, with mouth props or swabs.
-
Calculate your angles and direct the beam over the medial canthus
of eye onto the target tooth - this should be at approximately
45 degrees to the plate.
NB - in cats this angle should be nearer 30 degrees to prevent
superimposition of the zygomatic arch over the tooth roots and
extra-oral near parallel may be easier.
|
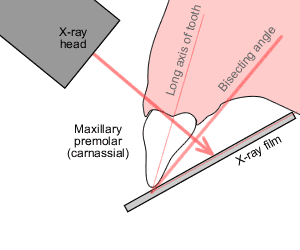
Intraoral bisecting angle for upper
carnassial tooth
|
-
Take a second, and perhaps a third, radiograph with no change
in the vertical beam angle, but move the tube head horizontally
(i.e. slightly rostrally or slightly caudally). Multiple views
of multi-rooted teeth are often required to limit the effects
of superimposition of roots - either by the adjacent teeth or
by another root of the same tooth.
|
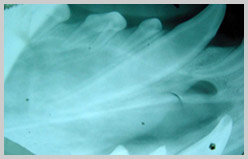
Radiograph of upper premolar 4 demonstrating
poor positioning. Note superimposition of mesial roots and
partial superimposition of caudal root on molar 1
|
|
|
|
|


